Hey everybody! I just wanna wish you all a Happy Halloween. I tried to post a few entries, but Blogger completely deleted them?! I'm utterly confused. Comment what you did and in my next post (today/tomorrow) you will get a shout-out!
Also make sure to check out my youtube account, AGpixiestudio.

Saturday, November 2, 2013

Wednesday, September 18, 2013
Popin and Sushi: 10th Birthday!


ME: middle MOLLY: left HOLIDAY: right


Well, that's all! See you next time!!!
~Marshmallowpandapuffs
Sunday, September 15, 2013
Udon Bento
Hey everyone! Sorry I haven't been posting lately. I've been busy with school . . . Jiu Jitsu . . . But I promise to post more often from this point!
Anyway, Hey!!! A few days ago my Mom made Udon, so I decided to make a DIY Bento out of it. Hey, why not? I used the Bento box I got for my Birthday to put it in, Pink with White Polka Dots.
 On the right side is a Soy Sauce "Squirter" I got for my Birthday, aswell. Also some chicken. On the left, bread Crumbs and Chive Onions, a relatively traditional Udon topping, of course, not bread crumbs, but a similar type of deal. This brings the DIY (Do It Yourself) effect.


How? , you may ask, Well, when I put the Chives and Crumbs and chicken on like SO...It's like I'm making the meal myself. Hence, DIY. It's quite fun, especially *Attempting* using the chopsticks! I can *Almost* Use them! *Almost* It is a delicate process, quite unique. Though some people can just, DO IT, or claim to, it's hard. Just like holding a pencil, there's a bad habit of holding it the wrong way. Eventually, if people keep telling you to, you will hold it correctly.

 And, as you can see, it looks quite lovely topped with Chives, Crumbs, and a Not-So traditional topper, Chicken. Hey, you need protein some time in your life.
 Now, to my favorite event. The Soy Sauce container! You know those Japanese soy sauce containers? Yep, that is what this is, but 4,008 % cuter.
 What I love most of all is the way it opens up and easily squirts out the Soy Sauce. Plus, the bottle is extremely secure. for a separate review, I'd say this is a very secure, handy product.

 So, conclusion, I ended up with a traditional DIY Udon Meal. Quite impressed of myself, Yes. With chopsticks, I mean.

Anyway, Hey!!! A few days ago my Mom made Udon, so I decided to make a DIY Bento out of it. Hey, why not? I used the Bento box I got for my Birthday to put it in, Pink with White Polka Dots.


How? , you may ask, Well, when I put the Chives and Crumbs and chicken on like SO...It's like I'm making the meal myself. Hence, DIY. It's quite fun, especially *Attempting* using the chopsticks! I can *Almost* Use them! *Almost* It is a delicate process, quite unique. Though some people can just, DO IT, or claim to, it's hard. Just like holding a pencil, there's a bad habit of holding it the wrong way. Eventually, if people keep telling you to, you will hold it correctly.


That's all for today but keep checking back for more! Next coming , How-to: Traditional Bento! Stay tuned!
~Marshmallowpandapuffs
Wednesday, August 28, 2013
My party: Cupcakes!
Hi everyone! I recently had my party, and wanted to show you all the Cupcakes I made for them!

We had 3 big balls worth of marzipan and colored it all. The eyes and mouth we used Nori! It gave a nice little salty flavor in the cupcake.


If you not sure what marzipan is, it is similar to fondant, just a lot tastier. Its Almond Paste with sugar and such. It's a TON stickier than Fondant, and is overall harder to work with, But my mom and I just love marzipan, so we couldn't resist. The colors we chose are so bright and festive, they could make any party sparkle! Check out this link to pinterest to see the original Idea for our Yummy Desserts! I hope you enjoyed, see you next time!
~MarshmallowPandaPuffs


Trust me, it was extremely fun--but hard at the same time! We colored marzipan and cut it out with all my Bento tools, shaped it, and put it on the cupcakes...

One of my favorite ones, no doubt, is the strawberry. We took little Sprinkle dots and with tweezers, put them on. We also had to make a tulip into a Stem--This took all night, literally! But all the work paid off. They were a big hit, but most of the girls just ate all the marzipan on top, and left the cake.


If you not sure what marzipan is, it is similar to fondant, just a lot tastier. Its Almond Paste with sugar and such. It's a TON stickier than Fondant, and is overall harder to work with, But my mom and I just love marzipan, so we couldn't resist. The colors we chose are so bright and festive, they could make any party sparkle! Check out this link to pinterest to see the original Idea for our Yummy Desserts! I hope you enjoyed, see you next time!
~MarshmallowPandaPuffs

Tuesday, August 20, 2013
Feather Handmade Jewelry!
Hi everyone! I'd Like to quickly Congratulate Marshmallowpandapuffs on 800 views! I am showing you a super cool Jewelry Booth I found at Irvine Spectrum run by this really cool person named Nimh! He made me a personalized ring, to fit my finger. He makes all jewelry and runs the booth full-time. He also is also very interesting. He buys most of his gems from Australia, which I think is really cool. His Company is Called Feather Handmade Jewelry.


 And below is the ring Nimh personalized for me! I love it and wear it a lot. The turquoise goes with a lot of the outfits I wear, since I love blue--So that's a plus! It also doesn't come off with a yank, you just ease it off easily, meaning it won't just fall off. I can wear it anywhere !

This set-up is beautiful, there are all earrings. If you look on the top you can see the green gem with the criss-cross wire on top--I like that one, along with the blue one, which will also perhaps go with every outfit I wear.

But, this has to be my favorite pair of Earrings. Ever. You can tell the Dream-Catchers' wire was carefully placed over eachother. When I look at it closely, it almost looks like a star...Made out of thread. I personally like the little gold feathers attached on the bottom end, it makes it look very whimsical.
 Last but not least, a pretty necklace I saw on display. I am a fan of how it is off-course, the beads on one time, but bare on the other side. It un-balances it, but makes it look quirky in a cool way!
 I hope you enjoyed this post, and make sure to Check Feather Handmade Jewelry on Etsy and at Irvine Spectrum!


This is one of the set-ups on the booth, mostly necklaces. One of the thinks I like most is the way he conforms the wiring on the necklace, it makes it look maybe even a little Metallic.
 And below is the ring Nimh personalized for me! I love it and wear it a lot. The turquoise goes with a lot of the outfits I wear, since I love blue--So that's a plus! It also doesn't come off with a yank, you just ease it off easily, meaning it won't just fall off. I can wear it anywhere !
This set-up is beautiful, there are all earrings. If you look on the top you can see the green gem with the criss-cross wire on top--I like that one, along with the blue one, which will also perhaps go with every outfit I wear.


Tuesday, August 13, 2013
Bookmarks!
Hey everyone! Today I'm showing you a few Bookmarks I've made--As a business! In school I sold bookmarks, and it became a big hit. I even have Coupons and everything! These are a few pictures of some of the orders I've filled!


Friday, August 2, 2013
How to: Popin Cookin Sushi!
Hi! Sorry I haven't been posting lately, but I have TONS of new things to review, How-to,etc! Today I hope you enjoy this post : - )
So one of my BFF's Gianna did Popin Cookin Sushi with me! It was really fun, and here she is!
 This is our set.
 FUN FACT: Popin Cookin SUSHI is one of the only Popin Cookin Sets that has changed it's packaging appearance so Frequently. This Packaging Model is the newest


 Cool! Now, there are little plates to put your sushi on. Cute!
 This is everything the Package comes with. Seaweed Candy, Spoon, 6 Mixes, Mold Tray, and Water-Picker-Upper (Wow I really need to google the real name for it ...)
 First we are going to make the sushi, it's the biggest packet and is Blue. Gianna mixes it around, filling it with water to the Line showed in the Mold.
 Easy enough, Yea? Well, now it gets a bit trickier!! Take the small Yellow Packet--This is our Tamago Sushi, which is a Japanese Omelet on rice.

 TIP: PUT WATER IN AFTER YOU PUT THE POWDER MIX IN
Mix until Yellow Tamago Sushi Top is spread evenly across the Mold.
 Now comes are Salmon Sushi! Repeat steps from Tamago Sushi.
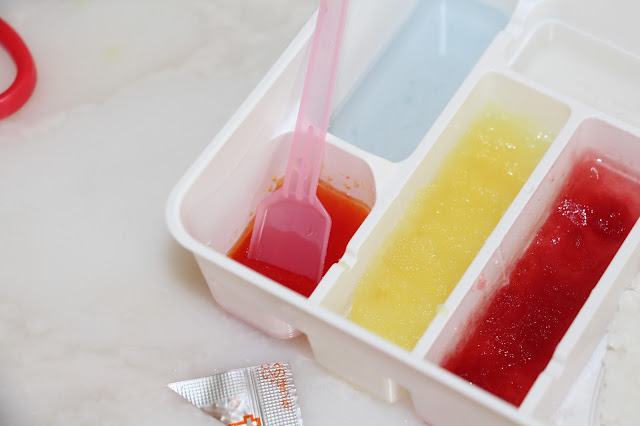
 So far, your basic Sushi area should look like this. Don't go messing around with the Tamago and Salmon, as that is Jell-o and you will interfere with the drying process if not handles correctly. For beginners, I suggest just leaving this the way it is because it will be flipped over, and not to touch it at all until you form your sushi.
 Now, MY MOST FAVORITE PART. The Caviar (More commonly known as in sushi) Or Fish Egg Sushi!!! This is truly Japanese magic! So, first take this turquoise packet.
 The bottom mold is marked 'B' and the top, 'A' . Fill in B mold with water to line shown.
 Take the orange packet (Notice the differ with Yellow packet)
 Mix together. This will be a lot more thicker - like syrup - than the other molds. When it has a decent consistency, (No lumps) you are ready to move on by putting the turquoise Packet into the A mold. It will be clear, this is normal! Now, Take your Water-Picker-Upper and fill it half-way with that Orange 'Syrup'. Put the Water-Picker-Upper about 2 inches above A mold, and squeeze! Little dots will come out making HARDENED EGGS *Squee!!!*


 Amazing. GENIUS. Spontanious. Now, let's make the sushi! Let's start by take a little bit of 'rice' and forming it into a ball. Yes, Gianna is doing it correctly.

Remember those plates I showed you? Well, now they shall be used.

Oh. WHO could forget the Nori?! Not me! Open it and flatten it out a ton.
 Now, on a different note, cut the Tamago and Salmon in half, then spoon one out. One Tamago Sushi, coming up!

 I gave it to Gianna (Who ordered it) and she LOVED IT.

Now, to make the Fish-Egg sushi. Reapeat the first step, making a ball, then, taking the rolled out nori, wrap it around the Riceball!

Pile Fish-Eggs on top and enjoy! Yep, that's what I ordered--and I love it.

Closeups, anyone?
 Now, the last event: Soy sauce! See that open space on the top? well fill it with water to the line and put the Brown Packet in. Mix, and put on your sushi! (WARNING: Not salty. More like...Cola.)

 Here are some other photos!

 Well, I hope you enjoyed this post. :) see you next time!
-~-MarshmallowPandaPuffs
So one of my BFF's Gianna did Popin Cookin Sushi with me! It was really fun, and here she is!

 FUN FACT: Popin Cookin SUSHI is one of the only Popin Cookin Sets that has changed it's packaging appearance so Frequently. This Packaging Model is the newest
These are all the directions (In Japanese -_-)


Mix until Yellow Tamago Sushi Top is spread evenly across the Mold.


Remember those plates I showed you? Well, now they shall be used.

Oh. WHO could forget the Nori?! Not me! Open it and flatten it out a ton.


Now, to make the Fish-Egg sushi. Reapeat the first step, making a ball, then, taking the rolled out nori, wrap it around the Riceball!

Pile Fish-Eggs on top and enjoy! Yep, that's what I ordered--and I love it.

Closeups, anyone?


-~-MarshmallowPandaPuffs
Subscribe to:
Posts (Atom)